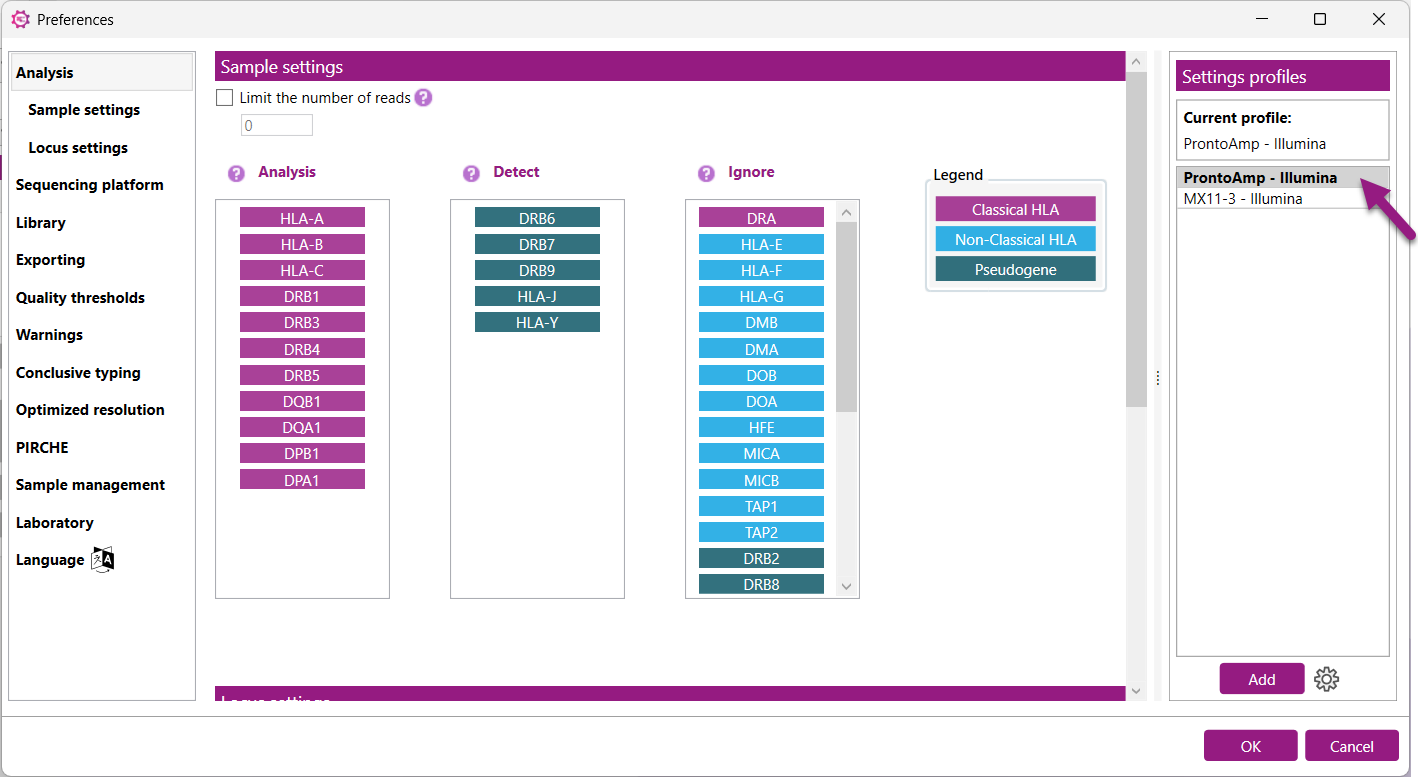
Preferences
In the preferences menu you can select different sub-menus in the side bar:
- Analysis
- Sequencing platform
- Library
- Exporting
- Quality thresholds
- Warnings
- Conclusive typing
- Optimized resolution
- PIRCHE
- Sample management
- Laboratory
- Language
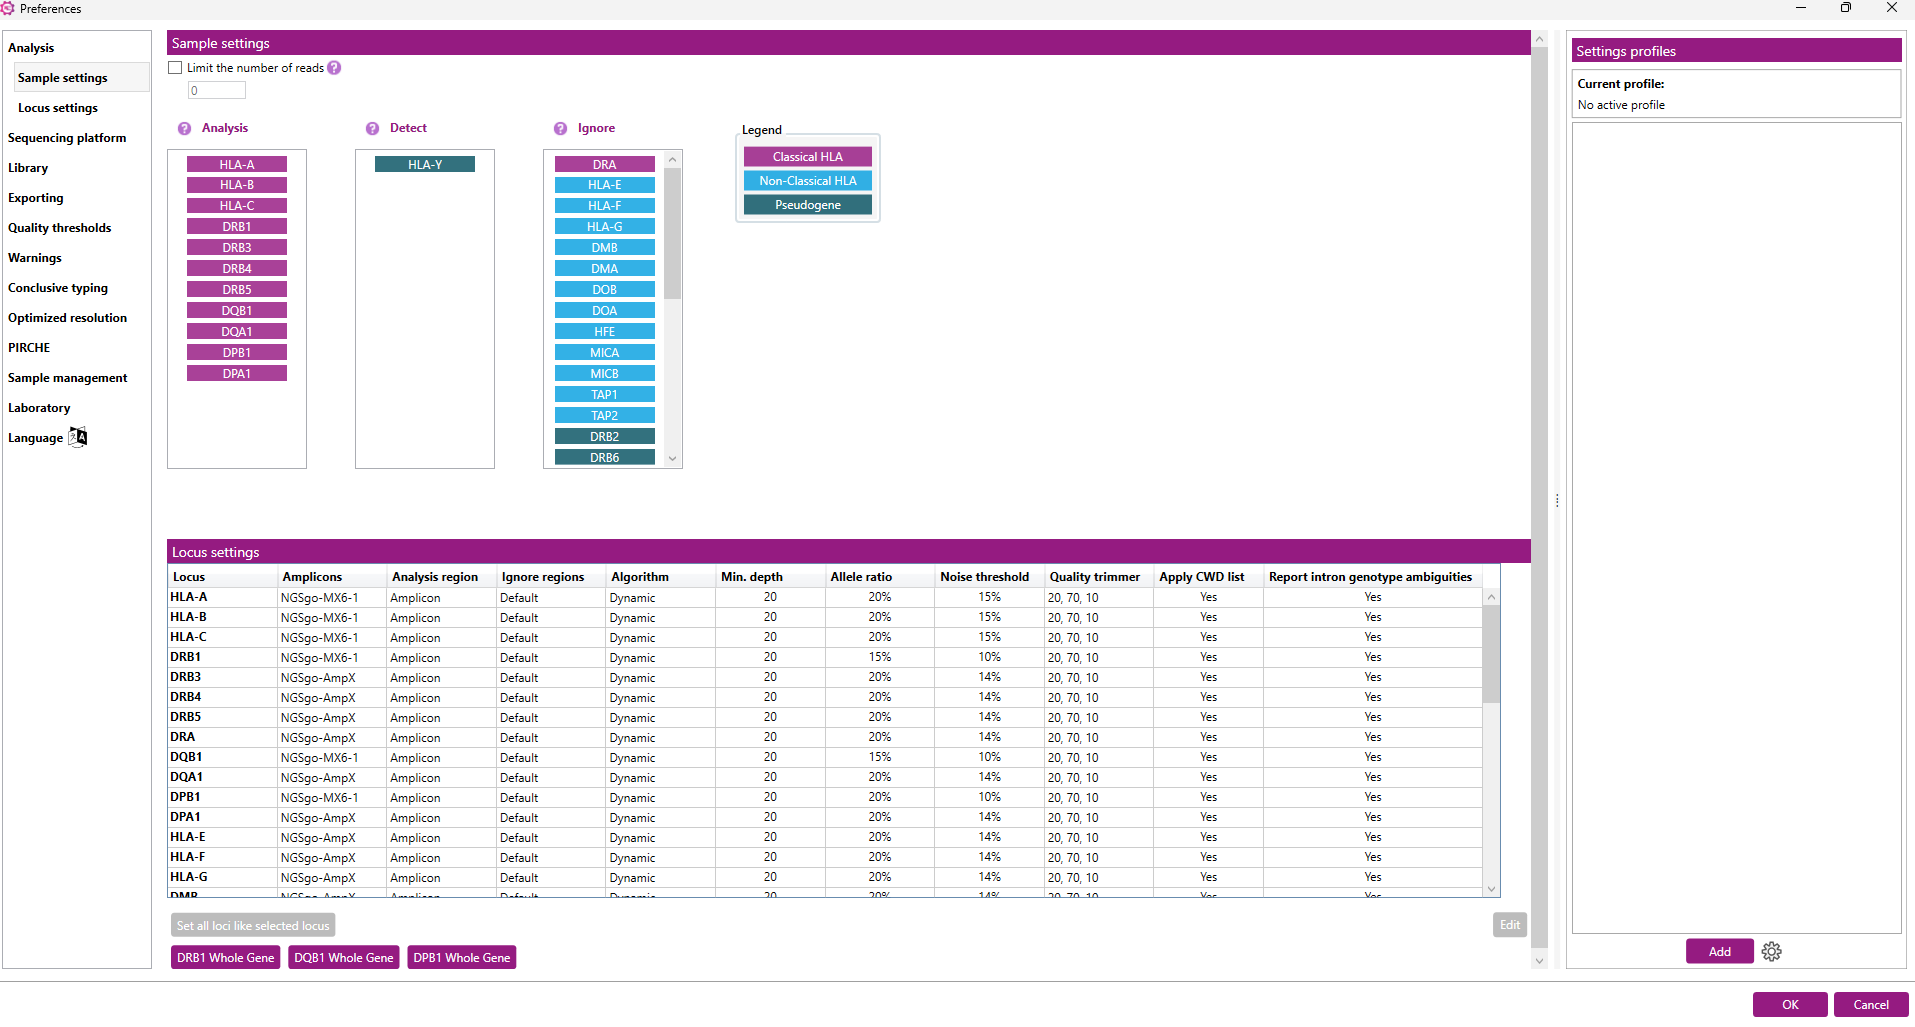
In the ‘Analysis’ tab, a Settings profile can be selected which contains predefined sample and locus settings. The sample settings determine which loci are automatically analyzed, detected or ignored. The locus settings determine ignore regions, analysis thresholds, phasing algorithm and more.
Limit the number of reads: Use an unlimited amount of reads to ensure that all reads are used for analysis. The number of reads can be limited to a maximum to prevent long analysis time. In this case, make sure that the read depth is sufficient for every sample and locus. The total amount of reads required to obtain a sufficient read depth is dependent on the amplification strategy. In case of paired-end analysis, the forward and reverse sequence are considered as one read. It is important to note that the read limit can be adjusted in the custom profile settings, but not in the default profiles.
Settings profiles:
Setting profiles contain predefined sample and locus analysis settings. A settings profile determines the global analysis settings that will be applied to all samples in the NGSengine project. There are two groups of profiles:
Default Profiles:
There are default profiles available for all GenDx amplification and sequencing strategies. We recommend to use the default analysis profiles when analyzing data generated with GenDx reagents. Default profiles cannot be created, deleted or modified by the user.
Note: When using DRB1 Whole gene (incl. DRB3), DQB1 Whole Gene or DPB1 Whole Gene for amplification, use the corresponding button underneath the locus settings for the correct settings.
Custom Profiles:
Users can create a custom profile by saving the current analysis settings. Because custom profiles can be saved in a shared location, it is possible for multiple users to access and use the same customized settings. To save a custom profile it needs to have a unique name. Once created, custom profiles cannot be renamed, and settings cannot be changed. However, custom profiles can be deleted or overwritten by a new profile with the same name.
Detailed descriptions for adding, loading and removing a profile are outlined below.
Adding a profile:
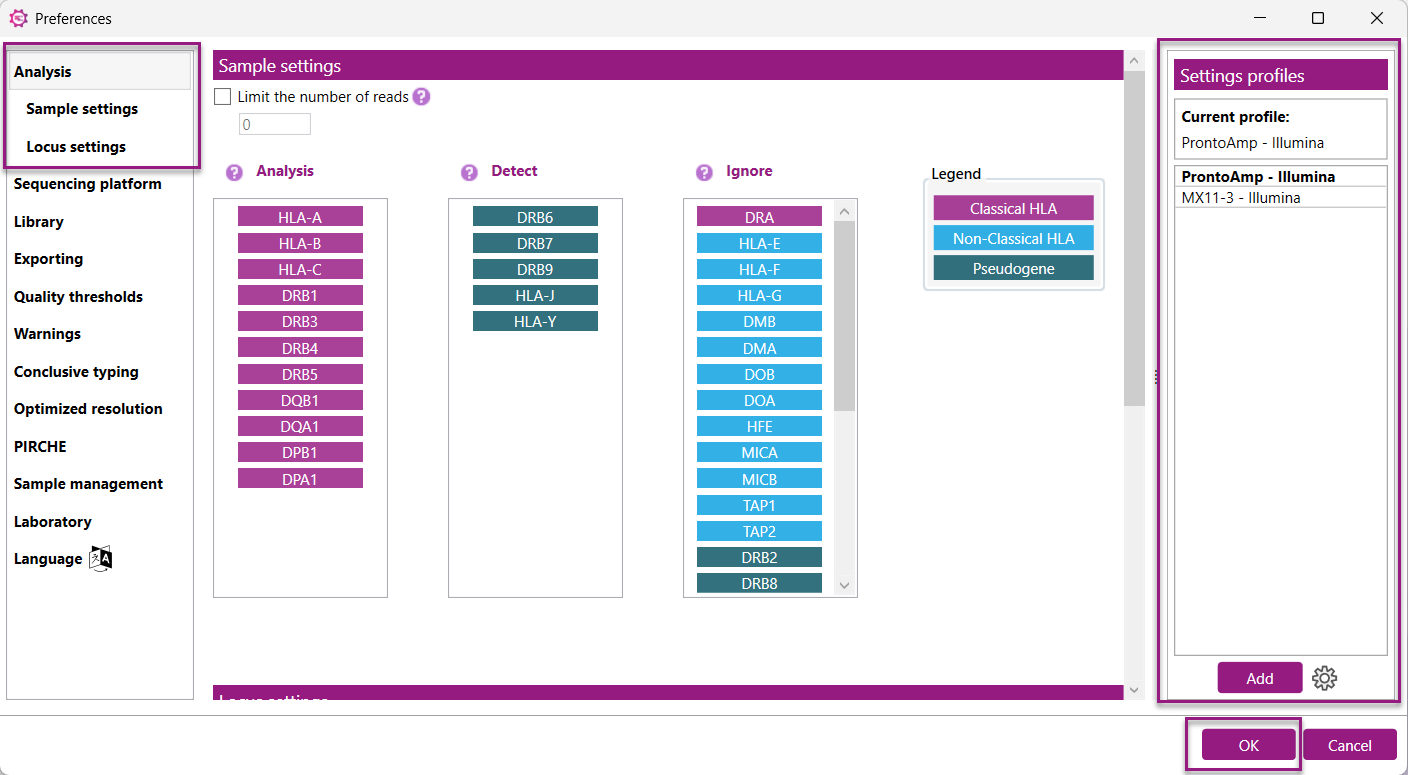
The profiles are managed in a table on the right side of the Analysis settings tab in the Preferences.
Adding a default or creating and adding a custom profile both start by pressing the ![]() button below the table. A popup window appears and depending on the type of profile, different options will be available.
button below the table. A popup window appears and depending on the type of profile, different options will be available.
i. Default profile
1) Select ‘Default’ from the Profile Group dropdown:
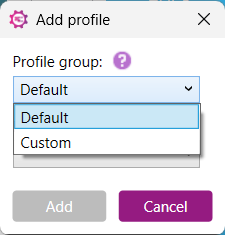
2) Select a predefined profile that matches your amplification strategy:

3) After selecting the profile of interest, click "Add". The selected profile will now be displayed in the Profile settings table on the right side of the settings window.
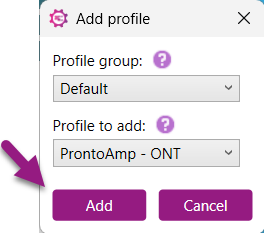
4) Click “Ok” to save the Preferences.
ii. Custom Profile:
Change the Sample or Locus analysis settings to match your preferred analysis strategy. It is possible to customize which loci should be analyzed or limit the number of analyzed reads. On a locus level it is possible to adjust analysis thresholds, analysis region, add custom ignore regions and more. When the analysis settings match your preferences, continue to create a custom profile to save your analysis settings for future use.
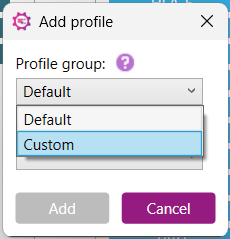
1) Select ‘Custom’ from the Profile Group dropdown:
2) Enter a unique name to save the current analysis settings as a custom profile:
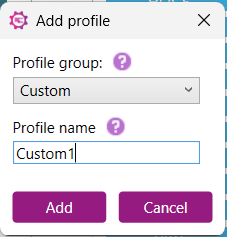
3) Click “Add”. The selected profile will now be displayed in the Profile settings table on the right side of the settings window.
4) Click “Ok” to save the Preferences.
Loading a profile:
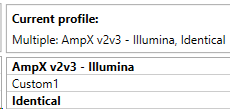
To load the analysis settings of a profile, double-click on the Settings profile name in the table on the right side of the Analysis Settings tab in Preferences. Active profiles are displayed in bold and also appear below ‘Current profile:’
When analysis settings completely match the analysis settings present in a Settings profile, the profile will also be displayed in bold. It is possible to create Settings profiles with identical analysis settings. In this case, it is possible that 2 profiles will be displayed in bold:
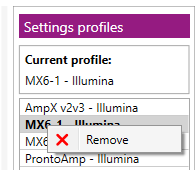
Removing a profile:
A user can remove a default or custom profile from the Settings profiles list as follows.
- Right-mouse click on the name to open a context menu and then select “Remove”:
- The following popup will appear asking for confirmation:
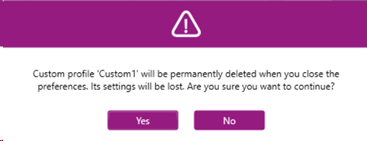
- Click “Ok” to save the Preferences.
Changing the profiles location
By default, the Setting profiles are stored in the ProgramData folder of NGSengine and thus shared between all users on a computer. However, users can decide to change the storage location to a shared location. This allows users to apply the same Settings profile on different computers.
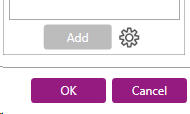
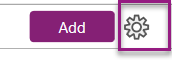
In order to change the location of the profiles, click the settings icon next to the “Add” button:
This opens a popup window where the profiles storage location can be changed:
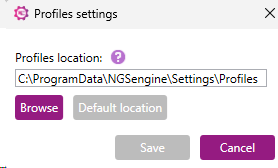
The profiles location can be manually changed or located via the “Browse” button.
The new path should either point to an empty/non-existing folder to create a new location or to an already existing location with profiles. If an existing location is selected that already contains profiles, the profiles will be automatically loaded into NGSengine.
A user can always reset the path to the default location by pressing the corresponding button.
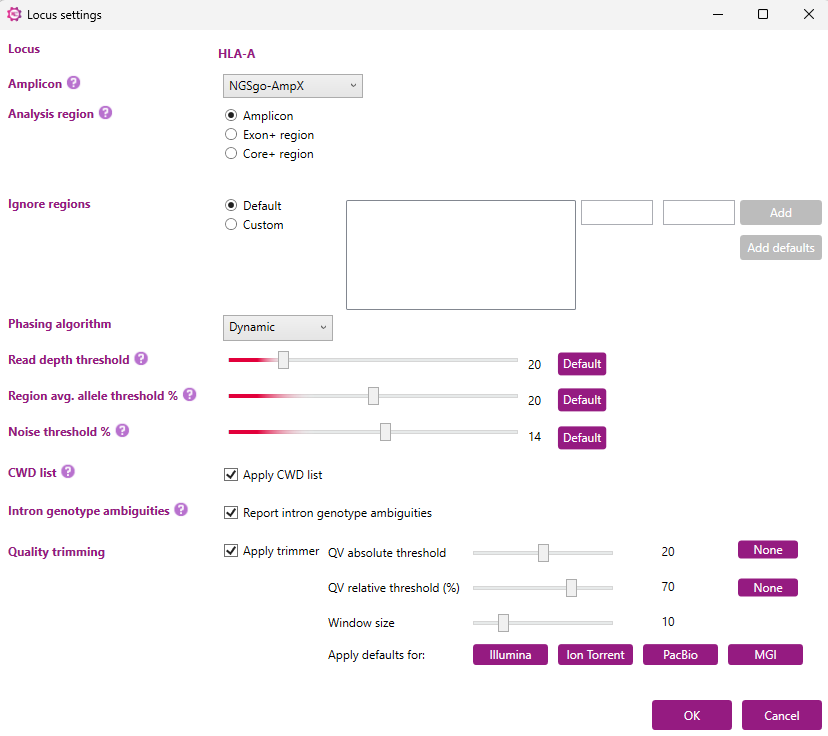
Locus analysis settings:
Here you can define the settings used to analyze a specific locus:
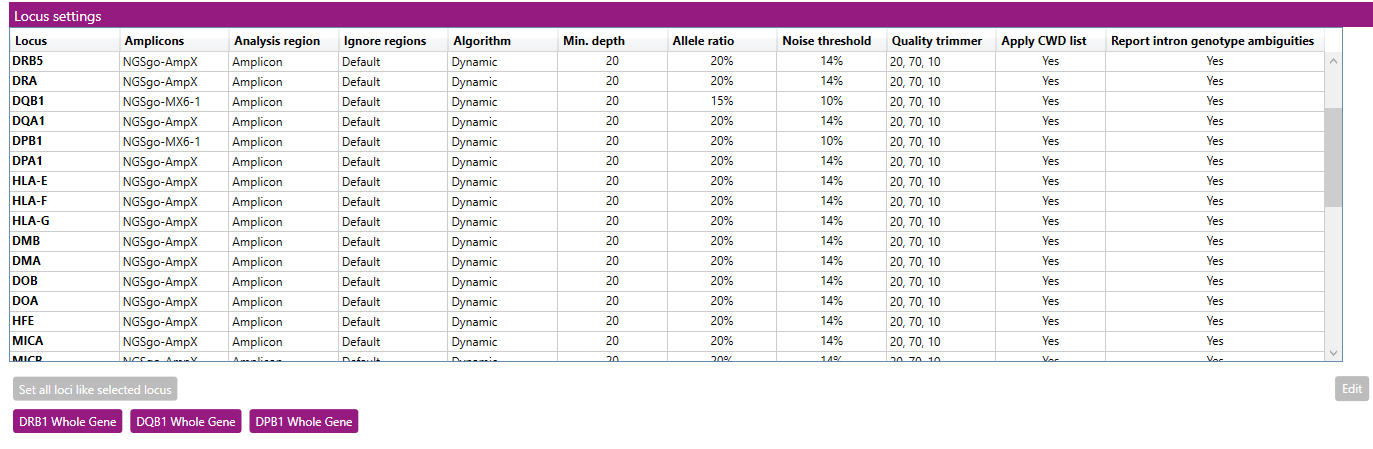
The window shows an overview of the settings per locus.
- Set all loci like selected locus: this button can be used to make changes in the settings for all loci at once. First change the settings for HLA-A (for example, as described below) and then click on 'Set all loci like selected locus' to apply the changes (except 'Analysis region' and 'Ignore regions') to all other loci.
- DRB1 Whole Gene: this button can be used to apply the NGSgo-AmpX v2 HLA-DRB1 Whole Gene default settings for DRB1 and DRB3.
- DQB1 Whole Gene: this button can be used to apply the NGSgo-AmpX v2 HLA-DQB1 Whole Gene default settings.
- DPB1 Whole Gene: this button can be used to apply the NGSgo-AmpX v2 HLA-DPB1 Whole Gene default settings.
When an option has been applied other than the NGSengine default settings, the 'Set all loci like selected locus' button will be greyed out and cannot be used anymore. This is to prevent that settings of alternative strategies will be applied to loci that are not included in the alternative strategy. This button can be enabled again after selecting the NGSengine default settings or after making a change to the HLA-A locus settings.
To change the settings for a locus: select the locus by clicking on it and then click on 'Edit'.
A new window will open in which the settings for this locus can be changed:
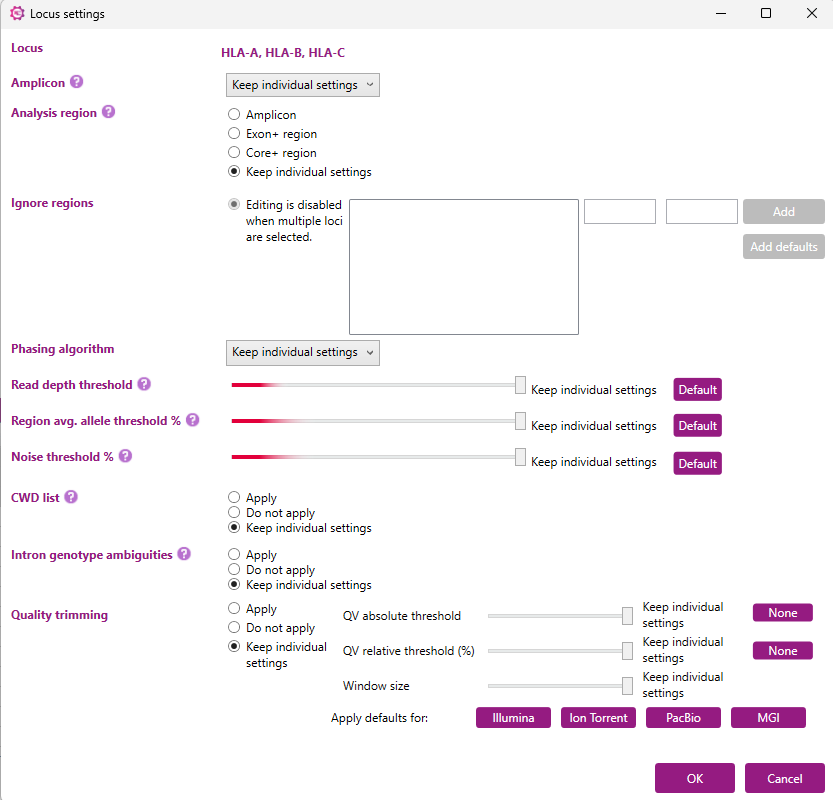
The settings for multiple loci can also be adjusted at once. By holding down the ‘Shift’ or ‘Ctrl’-button and clicking individual loci, a selection of multiple loci can be made. After this, the locus settings of all selected loci can be adjusted by clicking ‘Edit’.
By default, each option will be set at ‘Keep individual settings’ (see the example below, where HLA-A, HLA-B and HLA-C were simultaneously selected). This will ensure that the settings of each locus will remain as they are. Any changes made to the settings will be applied to all loci selected after clicking ‘OK’.
Amplicon
Here you can indicate the amplification strategy that you use. The 'Auto' option is recommended when a non-GenDx amplification strategy is used. With this option, NGSengine will automatically determine the beginning and the end of the amplicon. The amplification areas should be manually excluded by the end-user via the 'Ignore regions' option.
The NGSgo-MX6-1, NGSgo-MX11-3 and NGSgo-ProntoAmp amplification strategies cannot be selected manually via this window. They will be switched on automatically when that amplification strategy was selected when setting up the profile.
Analysis region
Here you can indicate which regions of the locus should be used for the typing analysis.
- Amplicon: Default setting is 'Amplicon' which means that the whole amplicon will be used for the typing analysis.
- Exon+ region: Only the exons plus flanking priority regions (including all splice sites) will be used for the typing analysis. Priority regions are intron regions that enable correct identification of the presence or absence of particular null alleles.
- Core+ region: Only the core regions plus flanking priority regions (including all splice sites) will be used for analysis. The Core+ region(s) are exon 2 and 3 for class I and exon 2 for class II genes, including flanking priority regions. For non-classical genes the same regions are used as for Exons+. Please note that by selecting Core+ region it might not be possible to detect certain (Null) alleles.
Ignore regions
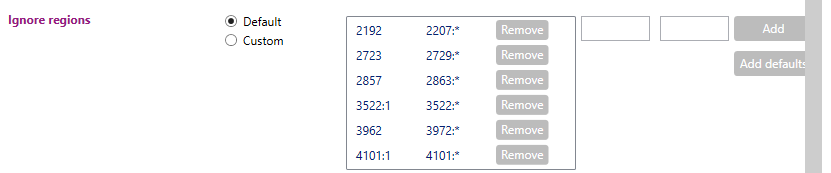
Here you can indicate which regions in the locus should be ignored during analysis. When 'Default' is selected, it is shown which regions are being ignored in the default setting (see picture above as example for DRB1). When no regions are shown, this means that there are no regions being ignored.
By switching the radio button from 'Default' to 'Custom', multiple regions can be defined that need to be excluded from the analysis. For example primer regions, or regions where the data is unreliable (as can be determined from the 'Base variation' graph in the statistics tab). These regions can be filled in in the small windows and then added to the 'Ignore regions' list:
By switching the radio button from 'Default' to 'Custom', multiple regions can be defined that need to be excluded from the analysis. For example, primer regions, or regions where the data is unreliable (as can be determined from the 'Base variation' graph in the statistics tab). These regions can be filled in in the small windows (outlined with the pink box) and then be added to the 'Ignore regions' list. Additionally, when in the ‘Custom’ mode, the default regions can be added back to the analysis by selecting ‘Add defaults’ (purple arrow). Each individually defined region can be removed from the analysis by clicking the ‘Remove’ button (pink arrow).

When defining the ignored regions, NGSengine supports two symbols that enable further specification of the exact coordinates.
The colon-symbol (:) can be used as a separator to define insertions on specific positions compared to the reference allele. For instance, 5370:2 includes gDNA position 5370 and 2 inserted nucleotides.
The asterisk-symbol (*) can be used to mark the start or end of the gene. For instance, by selecting a range from 103 until *, all nucleotides including and after gDNA position 103 will be ignored from analysis. Vice versa, a range from * until 103 will ignored all nucleotides before gDNA position 103 from analysis.
Both symbols can be used in conjunction as well, which is particularly useful when dealing with large insertions on specific positions. For instance, 5370:* refers to gDNA position 5730 and all possible inserted nucleotides.
Phasing algorithm
Here you can select the phasing algorithm that will be used for analysis. You can choose between 3 different phasing algorithms: Dynamic, Cluster or Classic. From NGSengine® version 3.0 onwards we recommend using the Dynamic algorithm for all loci. In older versions (version 2.31 and before) Cluster is the default setting, with the exception of DRB1 where Classic is the default setting.
The difference between the algorithms is explained here.
Read depth threshold
As a default, regions with a read depth lower than 20 are excluded from the analysis, as the nucleotide calling in these areas is unreliable. However, by lowering the 'Read depth threshold' settings, these regions can be included in the analysis. The red area on the left side of the bar indicates that you are using values which should be used only after careful consideration of the data.
Region avg. allele threshold
This setting affects the classic and cluster phasers but has no impact on the dynamic phaser.
The average allele threshold is determined for each phasing region of a locus. NGSengine estimates the percentage of the second allele for each region and based on this value determines the heterozygous positions having approximately this percentage as second basecall. To prevent too many false positive heterozygous positions, a lower limit of 20% (default) for this estimate is set. In case of unbalanced presence of the two alleles, this threshold can be lowered, at the cost of false heterozygous positions and performance for lower quality data. In most cases the false heterozygous positions are recognized in the rest of the analysis. When you see in the 'Base variation' graph that a second allele is present at a level lower than 20%, then you can lower this threshold and reanalyze to see the second allele in the typing result. In that case, you have to take care of the noise level threshold, that it stays lower than the allele threshold. For example: when you lower the allele threshold to 10%, you have to set the noise level threshold to lower than 10%.
An alternative method is to lower only the noise threshold, see below.
The red area on the left side of the bar indicates that you are using values which should be used only after careful consideration of the data.
Noise threshold
The noise threshold is the threshold below which a base percentage is regarded as noise. Bases with a percentage below the noise threshold do not qualify as being part of a heterozygous position and are ignored. For bases with a percentage above the noise threshold, the phasing algorithm will decide whether it is heterozygous or not.
When you see in the 'Base variation' graph that a second allele is present at a level lower than 20% and that there is a clear distance between the second allele level and the noise level, then it is possible to lower the noise level threshold (for example to 5% when you see that all the noise is below 5%) and reanalyze to see the second allele in the typing result.
The red area on the left side of the bar indicates that you are using values which should be used only after careful consideration of the data.
Quality trimming
The ‘Quality trimmer’ filters out bad-quality reads, and trims (removes) low-quality ends of reads.
The QV for a nucleotide in a read represents the quality of this nucleotide. A low QV means that the nucleotide is in general not reliable. Reads of low quality therefore can be identified as having low QV values for most of the nucleotides. Also, the quality of the nucleotides in a read decrease towards the end of a read. The quality value of each position for all reads together is shown in the ‘QV in reads’ graph in the statistics tab per locus. An explanation of this graph can be found here.
You can set two QV thresholds and a window size. If Window size is set to 10 (default setting), NGSengine will calculate for each read position the mean QV of that position and the next 9 bases. Setting the QV absolute threshold to 20 (default) will trim the read starting with the position where this mean QV drops below 20.
When you set a QV relative threshold, then NGSengine will use a threshold that is relative to the maximum QV of each read. For instance, when you set the QV relative threshold at 70% (default) and the maximum QV of a read is 38, then NGSengine will use 70% of 38 = 26.6 as QV threshold.
The QV absolute threshold, QV relative threshold and window size can be changed by the user. By clicking on ‘Default’ the default settings are restored. Each threshold can be disabled by clicking on the ‘None’ button behind it. By clicking on one of the default buttons, default quality trimming settings for Illumina, Ion Torrent or PacBio data will be applied. The Quality trimming can be switched off by unchecking the ‘Apply trimmer’ checkbox. For reads over 1250 base pairs, the quality trimming settings are not applicable since quality trimming is never applied
Please note: when the locus settings have been changed via the Preferences menu, then this is not applied to samples that have already been analyzed. It is only applied when a new analysis is done on a sample.
To do a new analysis on a sample that has already been analyzed, follow the steps shown in the sample and locus management section.
Sequencing platform detection:
The sequencing platform determines which quality metrics thresholds are used in the overview window.
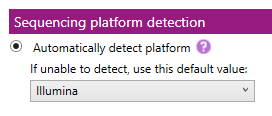
- Automatically detect platform: when this box is checked, NGSengine will automatically detect the sequencing platform of the new samples. When NGSengine is unable to detect the used sequencing platform, it will use the default platform that is selected in the dropdown menu.
- Set platform to: when this box is checked, NGSengine will use the settings for the selected platform for analysis.
The platform options are:
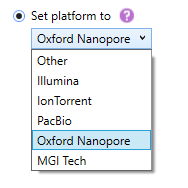
The detected or selected sequencing platform will be shown in the Overview screen on the left hand side, above the Project file name:
 PacBio subreads data;
  Ion torrent data;
  Illumina data;
 Oxford Nanopore data;
 ![]() MGI Tech;
MGI Tech; ![]() Other
Other
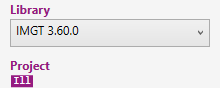
Here you can see which library is selected.
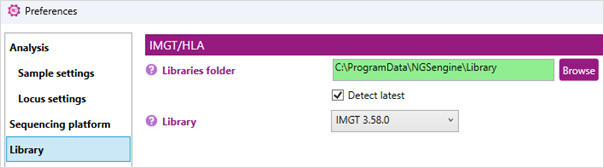
IMGT/HLA:
Change the library folder: when the background is green, the most recent version of the reference database is selected. To further ensure this, toggle on the 'Detect Latest' option. Another database can be selected via the pull down menu or by browsing directly to the location of the alternative database.
Here you can activate the automatic export of typing xml files:

Start by clicking on ‘New’, this will open a new window:
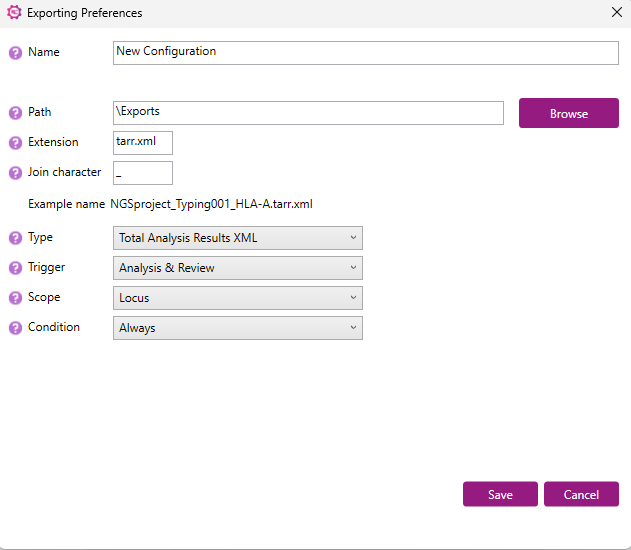
Name: enter a name for the export settings.
Path: select the location where the export files should be saved. Via 'Browse' a specific folder can be selected.
Extension: enter the extension of the export file name.
Join character: enter a separator to use between the name of the project, the sample and the locus.
Type: select from the dropdown menu the file format of the export file.
Trigger: select the automatic trigger type from the dropdown menu. The trigger is the moment that the export file will be created. There are 3 options:
- Review: export file will be made after every review action (e.g. approval or rejection of the locus or sample)
- Analysis & Review: export file will be made after each analysis or review action
- None: no export file will be automatically created. An export file will only be created by using the File > Export option as described here.
Scope: select whether the export will be generated per locus or per sample.
Condition: Select from the dropdown menu the condition that must be met for the export to be made.
When all settings are selected, click on ‘Save’.
In the Preferences window the export settings that have been created will be shown:

The settings can be edited or deleted, by clicking on 'Edit' or 'Delete'.
To switch off this feature, deselect the 'Enabled' checkbox.
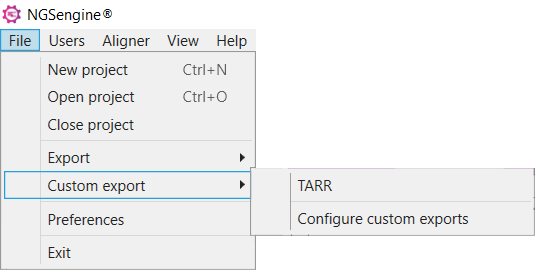
For projects that have been analyzed earlier, after following the steps above go to File > Custom export > select the name of your exporting preference:
Generation of the xml files in this manner might take a couple of minutes.
Here you can create or change quality thresholds per sequencing platform:
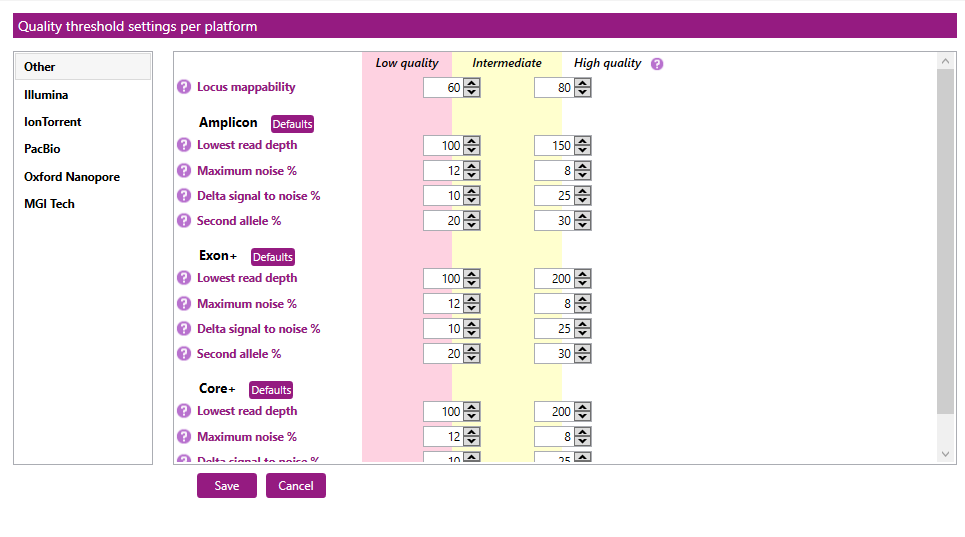
In the first column you can select your sequencing platform: Other, Illumina, IonTorrent, PacBio (for subreads) , Oxford Nanopore or MGI Tech.
For each sequencing platform, separate quality thresholds can be created for the Locus mappability and per genetic region (Amplicon, Exon+ or Core+).
These quality thresholds are used when the quality metrics are applied on the Overview screen. The color patterns can be used to obtain an overview of the data quality per locus. Low and intermediate values are displayed in the colors red and yellow, respectively.
For each quality threshold, two values can be set: the threshold between Low quality and Intermediate quality, and the threshold between Intermediate quality and High quality.
- Locus mappability: The percentage of accepted reads of all reads assigned to the locus.
- Lowest read depth: The number of reads at the position with the lowest read depth.
- Maximum noise %: The percentage of noise at the position with the highest noise level. Noise means base call errors arisen during sequencing.
- Delta signal to noise %: The difference between the highest noise and lowest heterozygous fraction in %.
- Second allele %: The median percentage of the heterozygous positions of the allele with the lowest abundance.
After clicking on "Save" the settings are stored and are used for the quality metrics on the Overview screen.
By clicking on the "Defaults" button, all values will be restored to default settings.
Here you can select whether or not NGSengine will show warnings in the Overview screen related to the DRB1 and DRB345 typing, or related to approving results with low quality metrics.
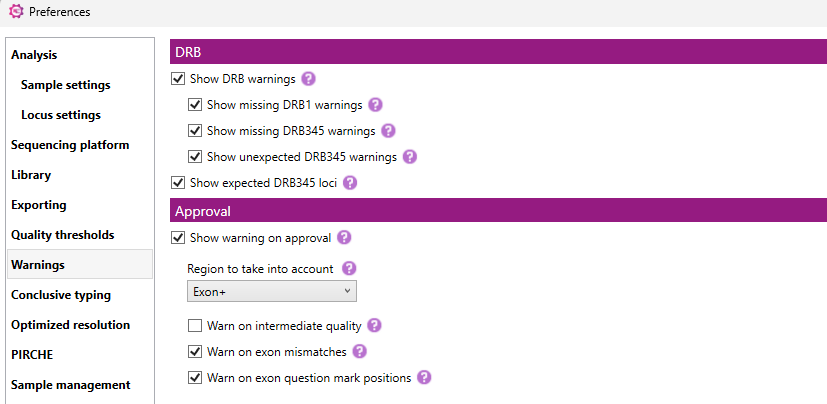
DRB warnings
Show DRB warnings: when this box is checked, NGSengine will show DRB related warnings. This option should only be used when both DRB1 and DRB345 have been amplified.
With the other checkboxes, you can select or unselect each specific type of warning:
- Show missing DRB1: a warning is shown when a DRB345 locus is found, but there is no DRB1 locus found. This is shown as an exclamation mark before the DRB345 typing in the Overview screen:

- Show missing DRB345: a warning is shown when a DRB1 locus is found, but there is no DRB345 locus found, or the expected DRB345 locus is not found. This is shown as an exclamation mark before the DRB1 typing in the Overview screen:

- Show unexpected DRB345: when a DRB345 locus is found that is not expected, this is shown as an exclamation mark before the DRB345 locus that is found:

Show expected DRB345 loci: when this box is checked, the expected DRB345 loci are shown based on the DRB1 typing result. This is shown in superscript next to the DRB1 typing.

Approval warnings
Show warning on approval: when this box is checked, NGSengine will show warnings when approving a typing result with low quality metrics, with intermediate quality metrics (if selected) or with exon mismatches.
- Region to take into account: select the quality metrics region that will be used to determine whether a warning is required (Core+, Exon+ or Amplicon). The default setting is Exon+, because when Amplicon is selected there will be a lot of typing results with approval warnings due to data quality in the intron regions. Therefore we recommend to use the Exon+ region.
- Warn on intermediate quality: when this box is checked, the warning will also be shown with intermediate quality metrics.
- Warn on exon mismatches: when this box is checked, a warning will be shown when there are exon mismatches.
- Warn on exon question mark positions: when this box is checked, a warning will be shown when there are questionable postions in the exon+ region.
Here you can set the 'Conclusive typing' settings per locus:
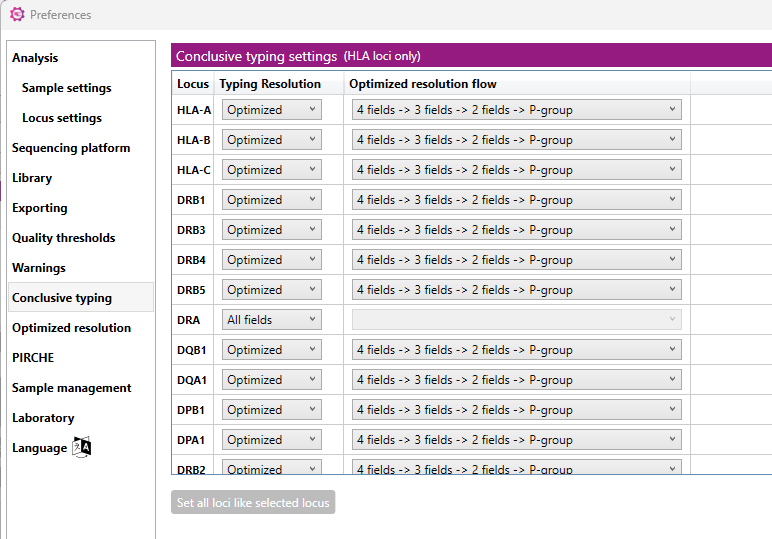
For each locus you can customize the resolution of the typing result as shown in the Overview screen and in the Genotype ranking table. Each locus can be set separately to a specific resolution.
To facilitate re-analysis of a single locus with adapted settings, the Locus settings window can also be accessed from the Overview window by using the right-mouse button and select 'Locus settings' or by clicking on the Settings icon behind the locus:

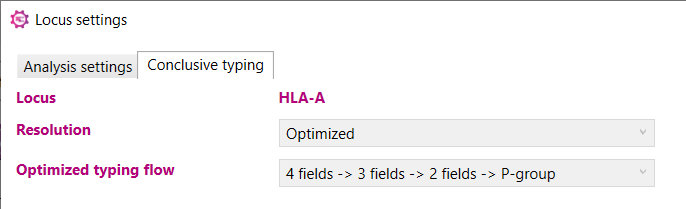
Here you can define the minimal resolution level of the 'Optimized typing' result:

The 'Optimized typing' algorithm follows a certain hierarchy, which can be defined in this window:
- First 4 fields, followed by 3 fields, 2 fields, P group and finally G group level
- First 4 fields, followed by 3 fields, 2 fields, G group and finally P group level
The order of the P group and the G group can be changed by clicking on the 'Switch' button.
By checking the box in front of the required resolution level, the required minimal resolution level can be defined.
The default setting is 'P group' which means that the minimal resolution level will be at least P group. It can be changed to another resolution level, for example: when '3 Fields' is selected, then the optimized typing result will not condense to 2 fields, P group or G group level.
A further explanation of the 'Optimized typing' feature is described in the Overview screen section, and can be found by clicking here.
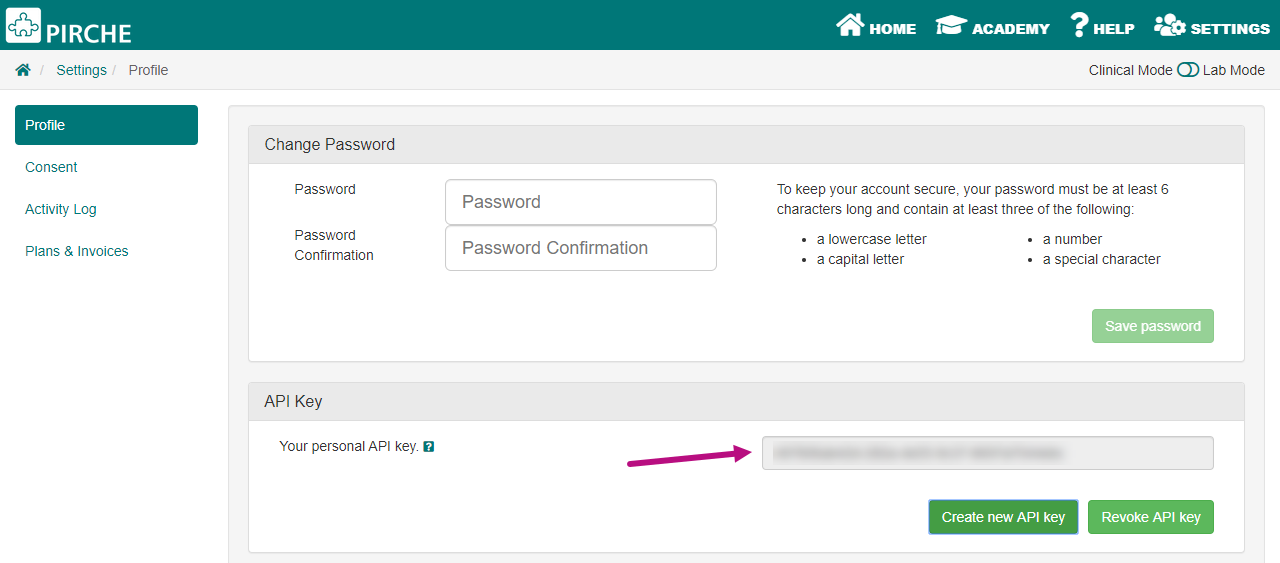
PIRCHE® is a new technology for estimating risk of immune responses after transplantation. It is the first HLA matching algorithm taking account the indirect pathway of allo-recognition (for details, please go to the PIRCHE website).
The input of the algorithm is the HLA genotype of a sample. The output of this algorithm is a score (number), to be considered, when searching for a donor.
For access to this PIRCHE export feature in NGSengine, please contact PIRCHE for a username and password. Upon login to the PIRCHE website, you will have access to a personal API key that can be found under settings/profile.
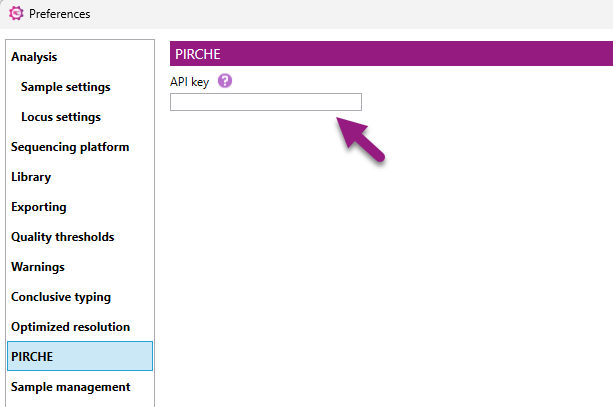
This API key should be entered in NGSengine in the Preferences under section ‘PIRCHE’ to activate the PIRCHE export feature as shown below.
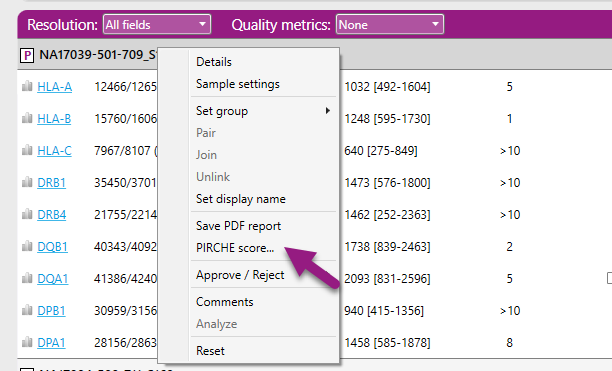
NGSengine allows for easy exporting of HLA genotypes to the PIRCHE website. For this, right-click on an analyzed sample and click on ‘PIRCHE score’.
This will open the web browser of the PIRCHE website and the alleles of the sample are automatically filled in for the user. By entering the sample name and then left clicking on 'Search Profile', the results are shown and the PIRCHE score is calculated.
Here you can select a few options for file and sample name handling.
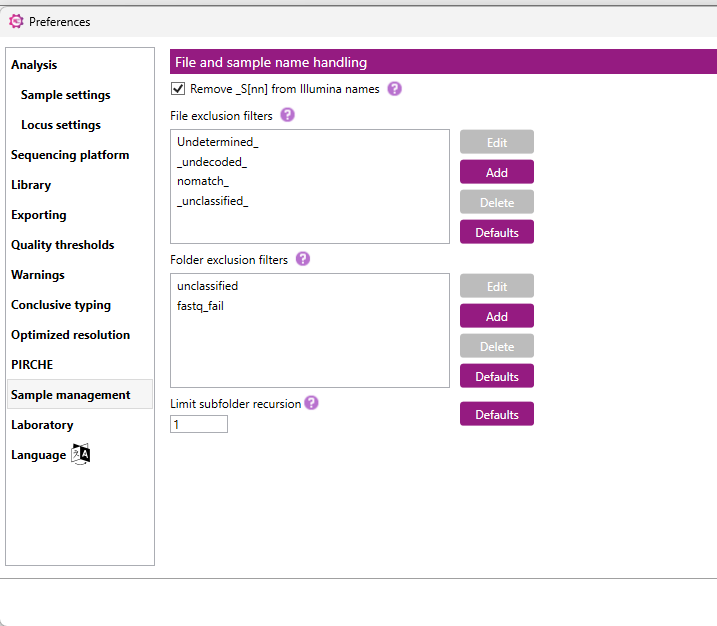
Remove _S[nn] from Illumina names: applies only for Illumina data. When this box is checked, the _S[nn] extension (where nn represents a number, e.g. _S2 or _S13) will be removed from the Sample names in the Overview screen.
File exclusion filters: here you can fill in the sample names for samples in the project that should be excluded from analysis (e.g. Undetermined_ or Test_). This is case insensitive.
Folder exclusion filters: here you can fill in the name of the folders that NGSengine will not automatically include in the analysis (e.g. unclassified or fastq_fail). This is case insensitive.
With the 'Edit', 'Add' or 'Delete' buttons you can edit, add or delete the indicated fiters. The 'Defualts' button will display the defualt filters set in the software.
Limit Subfolder Recursion Depth: This will control how deeply the software will look into subfolders when scanning a main data folder. This value is a range of 0 to 10.
When you select a root (main) data folder, NGSengine may include subfolders within it. This setting specifies how many levels deep into those subfolders the software should go to collect files.
For example:
- If you set the recursion depth to 1, NGSengine will include only the immediate subfolders under the main folder.
- If set to 2, it will include subfolders and their sub-subfolders.
Clicking the 'Defaults' button will display the default subfolder recursion depth, which is set to 1.
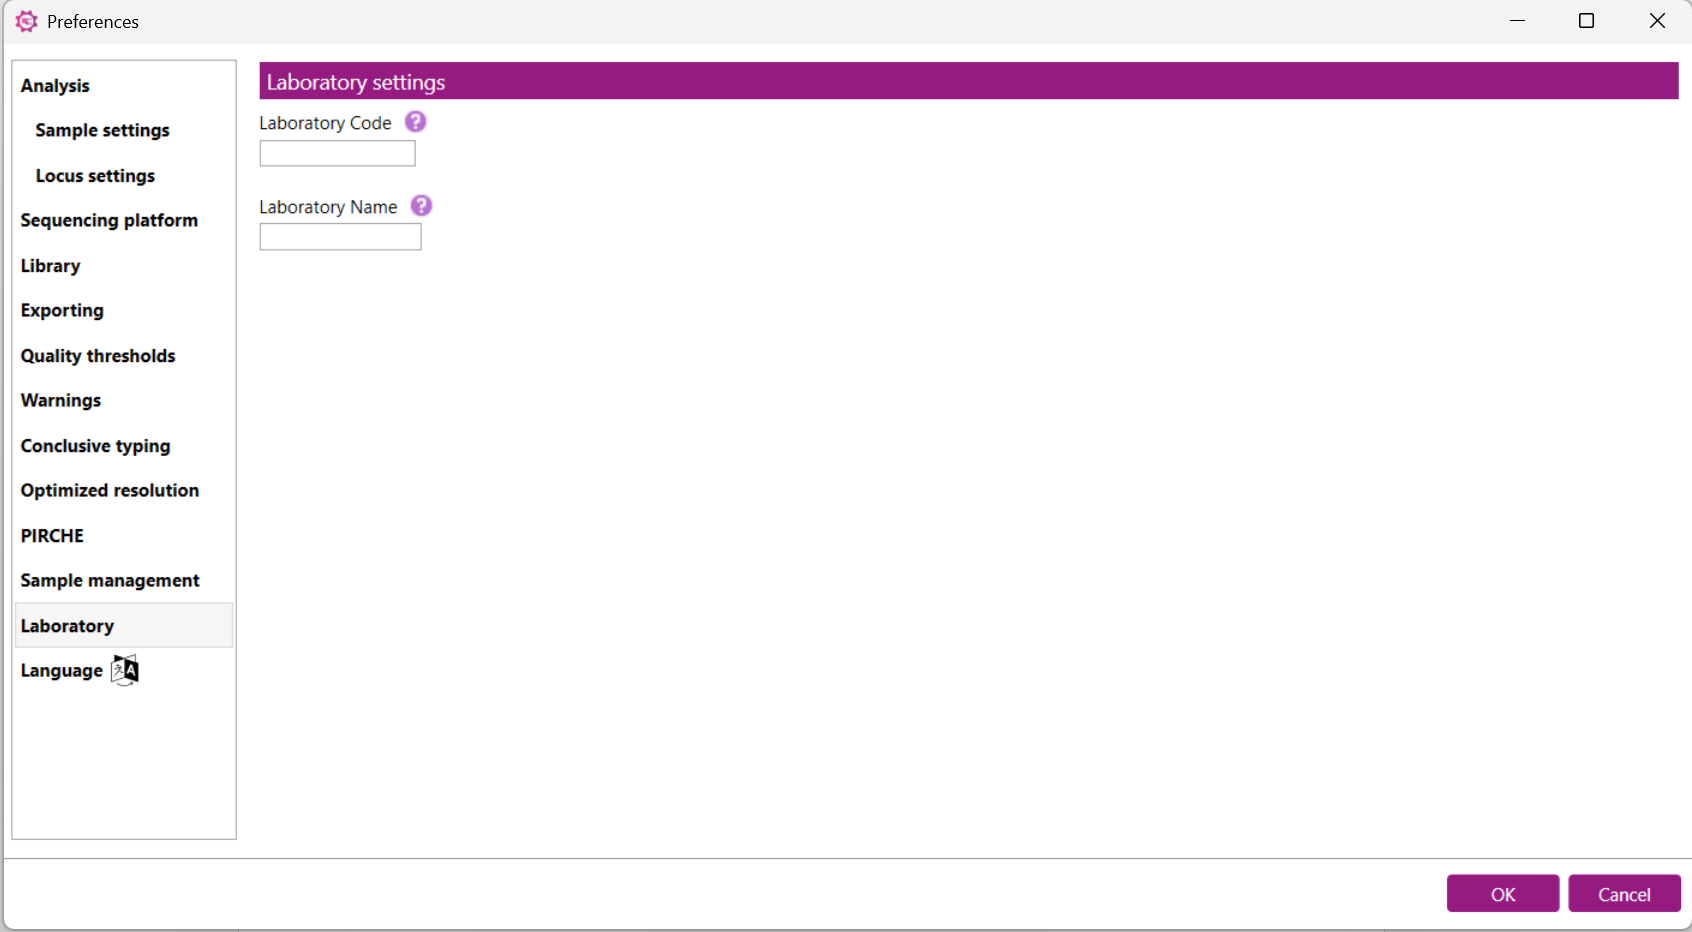
Here you can define the Laboratory Code and Laboratory Name. The Laboratory Code is used in the HML, IBMDR and REDMO exports.
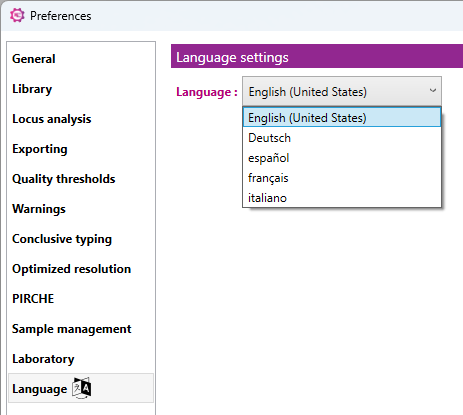
Here you can select different language settings for NGSengine.
You can choose between English, German, Spanish, French, and Italian. After selecting the language of interest, you can click 'OK'. This language will be automatically implemented in NGSengine.